North References (True, Magnetic, Grid) and Declination
The three norths
A bearing is "the angle clockwise from north" — but which north? Three answers, all in active use, all slightly different.
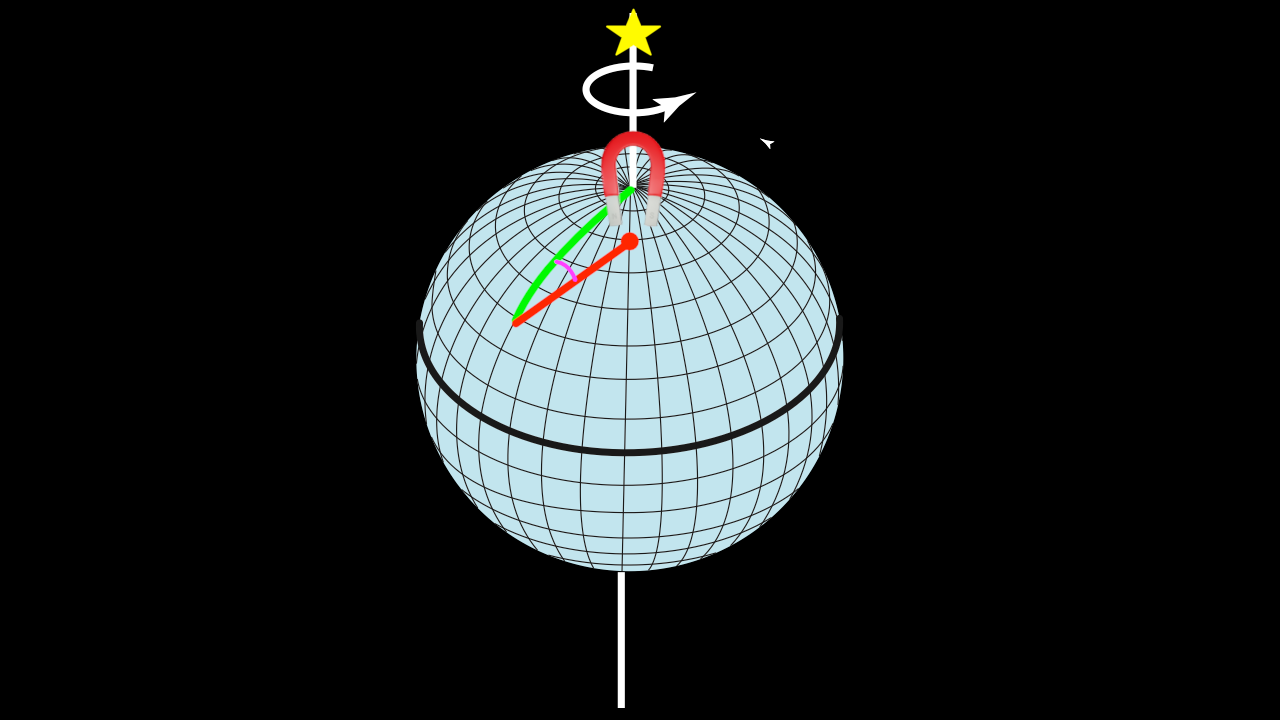
- True North — the axis of the Earth's rotation. Lines of longitude (meridians) converge at the true North and South Poles. The North Star sits nearly above the true North Pole; that's what made celestial navigation possible.
- Magnetic North — the direction the Earth's magnetic field points. A free-floating magnetic needle in a compass aligns with the field and points to the magnetic poles. The magnetic poles are not the true poles, and they drift over time.
- Grid North — the north reference of a UTM-style flat grid printed on a map. Grid North is useful because it lets you use the UTM Coordinates grid lines on the map as your north reference. It differs slightly from True North; how much depends on your position within the UTM zone.
These three are different physical directions. Every bearing you take is implicitly referenced to one of them.
When you plot a bearing using the printed UTM grid on your map, you've just used Grid North as your reference — and Grid North isn't True North.
The angles between them
True North is the geometric reference. Magnetic North and Grid North are described by their angle and direction relative to True North.
- Declination — the angle and direction of Magnetic North relative to True North. In the continental U.S., declination ranges from roughly 10° east to 20° west. This is the big one — the angle every compass user has to account for.
- Grid convergence (sometimes "grid variance") — the angle and direction of Grid North relative to True North. Stays inside a 2° band over most of a UTM zone, grows toward zone edges and at high latitudes.
The difference between Magnetic North and Grid or True North changes depending on your location. It also changes with the passage of time.
Get current values for your location from the declination diagram on your map (with the caveat that it may be out of date), the NOAA declination calculator, or the MapTools Declination Reference Sheet tool.
Your tools each have a north reference
The three norths aren't abstract: they live in your tools. Each of your navigation tools — compass, map, GPS — carries one or more specific north references. Knowing which is which is the difference between a tool you can trust and a tool you're guessing with.
- The compass measures bearings against Magnetic North by default. Many compasses have an adjustable declination bezel that offsets the needle reading so the compass reports bearings against True or Grid North instead. The adjustment is correct only for the location and date it was set for; move significantly or wait long enough, and the setting needs to be checked.
- The map has its north reference baked into its lines. A USGS topo with a UTM grid uses Grid North along the grid lines and True North at the map edges. The declination diagram in the margin shows the offsets between all three.
- The GPS receiver can be configured to display bearings against any of the three norths. The setting is usually under Setup → Heading or North Reference.
A common failure mode: you don't actually know which north reference your compass is set to — "a friend set it up for me a while back — I'm not sure" is the real answer that comes up. That compass is effectively useless until the setting is verified. Same logic for a borrowed GPS or an unfamiliar map.
Moving a bearing between tools
When you move a bearing from one tool to another, the math depends on which norths the two tools are using. A bearing on a magnetic compass and the same direction on a grid map are different numbers.
You can sidestep the per-bearing conversion by configuring your tools to share a north reference: a declination-adjusted compass paired with a grid map needs no conversion at the moment of use. You've paid the conversion cost once, at compass setup, instead of every time you move a bearing.
When your tools don't share a reference — un-adjusted compass and a grid map, or a GPS set to magnetic and a map drawn to grid — every bearing transfer is a conversion. Apply the procedure explicitly (see Converting between north references) and don't rely on memory.
Setting up your tools
Each tool needs a setup. The map: identify what north references are printed and decide which to use. The compass: pick a strategic stance. The GPS: set the right menu option.
Setting up your map
The map isn't configured the way a compass or GPS is — its north references are baked in. Setup means identifying what's there and choosing which to use.
- Identify the available north references. Lat/lon lines (or map edges aligned with lat/lon) give you True North. The UTM grid gives you Grid North. A few maps include Magnetic North reference lines; some users draw their own.
- Look at how many reference lines are available. A protractor needs a nearby reference line to align with. Just the map edges aren't enough — they're often far from the bearing you're measuring. The UTM grid offers numerous reference lines and is the practical choice for most maps that have it.
- Add lines for a missing reference, if needed. A common move: pencil in Magnetic North lines on a UTM-gridded map so you can plot magnetic bearings directly.
- Decide which reference you'll use. Pick one and use it consistently.
Setting up your compass
How you handle the three norths depends on how you set up your compass. Pick one strategy and be consistent — half-measures (sometimes adjusting, sometimes not, never sure which) are a good way to get lost.
"Set your compass and forget it"
Adjust the compass's declination bezel once for the local declination. From then on, all bearings the compass reads are grid (or true) — no conversion needed for map work.
- Don't forget to check the setting occasionally.
- Don't forget to change it when you go somewhere else.
- An incorrectly adjusted compass is useless for anything beyond a general sense of direction and may be worse than no compass at all.
"Set your compass to 0° and always think about it"
Leave the compass un-adjusted. All bearings are magnetic. Convert to Grid or True when doing map work, or draw Magnetic North reference lines on the map.
This works with any compass, including fixed-bezel ones. It costs you a conversion every time, which is fine at a desk and tiring in the field.
Setting up your GPS
Your GPS can be set to use any of the three north references. The choice is usually under Setup → Heading or North Reference. Some receivers offer "Automatic," which means the GPS calculates the local declination and displays bearings relative to Magnetic North.
Match the GPS's north reference to whatever north reference you're using on the map and compass. Mismatches produce silent disagreements that are hard to trace once you're in the field.
Converting between north references
When two of your tools use different norths, the same direction has different bearing values. Converting between them is a geometric problem you can work out directly on the declination diagram printed on most topo maps.
The declination diagram on a topo map
Most paper maps print a small declination diagram showing the three north references relative to one another. It typically includes:
- An arrow pointing to the top of the map, parallel to the map edges. This is the "top of the map" north reference — for USGS topos this is True North.
- A second arrow showing the declination angle to Magnetic North, with the angle labeled in degrees and the date the angle was determined.
- A third arrow showing Grid North (the convergence angle from True North), if the map carries a UTM grid.
Useful exercise: trace a bearing line from a fixed point and add it to the diagram, so you can see what the same line looks like measured against each of the three norths. The line doesn't change; only the angle from the reference changes, depending on which arrow you measure from.
The conversion procedure
If you have a MapTools Declination Reference Sheet for your location, the diagram with bearing line, arcs, and conversion angle is already drawn for you — skip to step 4.
Otherwise, work it through on the declination diagram on your map:
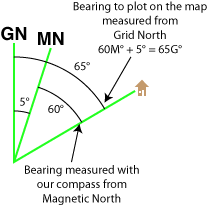
- Add a bearing line to the diagram, representing the direction you want to convert. Aim for something between about 45° and 90° from True North; the exact angle isn't critical.
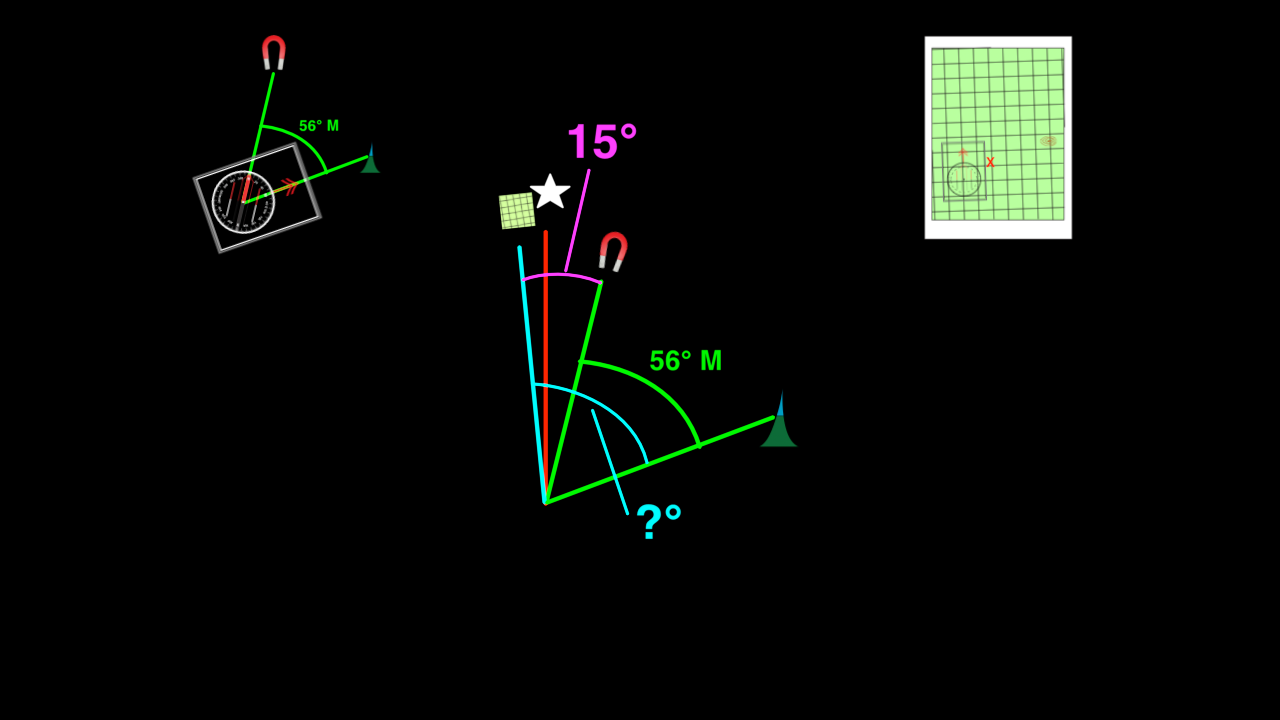
- Identify the two north references you're converting between, and draw arcs clockwise from each reference line to the bearing line. Each arc is the bearing to your target from that north reference.
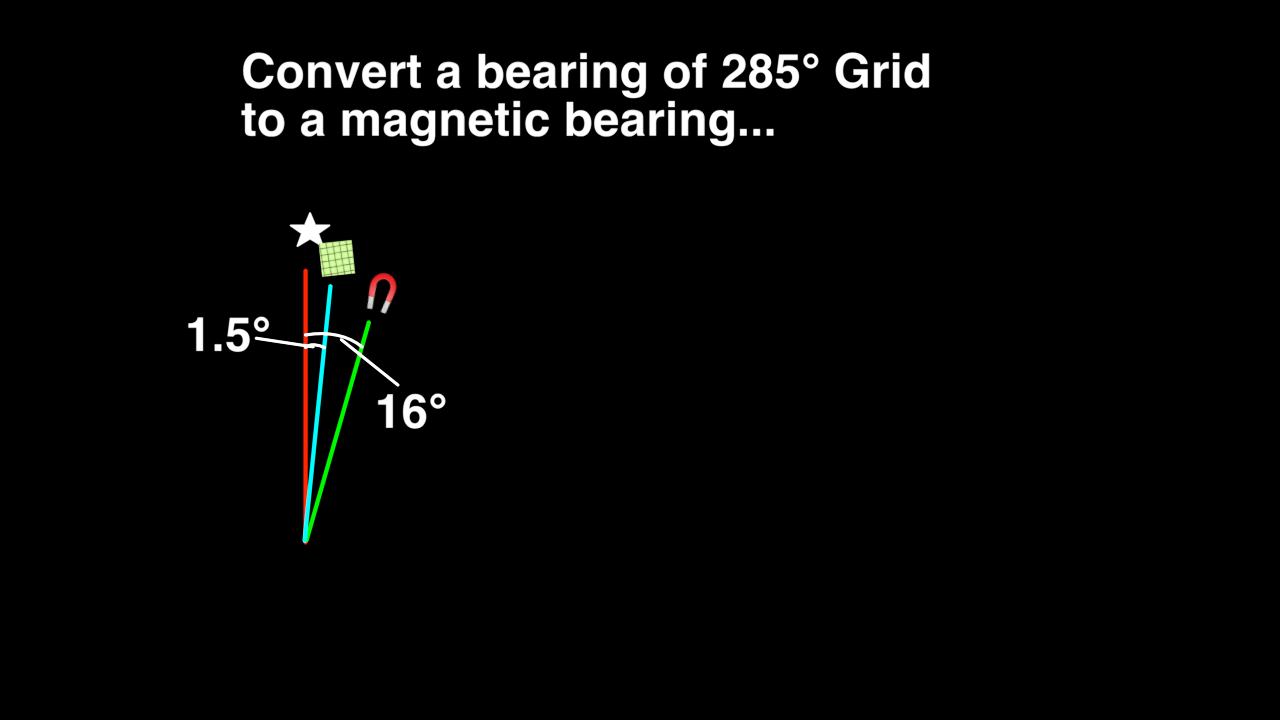
- Identify the conversion angle. It's the angle between the two north reference lines on the diagram, read directly from the printed values: declination for True ↔ Magnetic, grid convergence for True ↔ Grid, or their combination for Magnetic ↔ Grid. (Use the NOAA declination calculator if the printed values are dated.)
- Identify which north reference gives the larger bearing to the target.
- Apply the conversion:
- Larger-bearing reference → smaller-bearing reference: subtract the conversion angle.
- Smaller-bearing reference → larger-bearing reference: add the conversion angle.
A worked example
You're using Grid North on the map and Magnetic North on the compass. From the declination diagram, the angle between Grid North and Magnetic North is 10° — that's your conversion angle. The arcs show that the Magnetic bearing to the target is larger than the Grid bearing. Therefore:
Magnetic bearing = Grid bearing + 10°
Grid bearing = Magnetic bearing − 10°
Why precision doesn't matter as much as you think
You are probably fooling yourself if you think you need more than one degree precision.
A 1° error in declination produces about a 90-foot offset per mile traveled. That's enough to matter on a multi-mile route — but between compass needle drift, hand-held bezel-reading error, anomalous declination at the local site, and step-counting drift, sub-degree precision washes out long before it matters in the field. Survey work is different. Foot navigation is not.
Don't kid yourself about precision. The goal is to be correct to the nearest degree, not perfect.
Anomalous declination
Declination varies smoothly over most of the continent — but not everywhere. Local magnetic anomalies (iron ore, basalt outcrops, even some buildings) can deflect a compass needle from the regional value, sometimes by a lot. Examples from the field:
- 3-4 degrees is common
- North of Kingston, Ontario; 90° of anomalous declination.
- Kingston Harbor, Ontario; 16.3° W to 15.5° E of anomalous declination over two kilometers (1.2 miles); magnetite and ilmenite deposits.
- Savoff, Ontario (50.0 N, 85.0 W). Over 60° of anomalous declination.
- Ramapo Mountains, northeastern New Jersey; iron ore; compass rendered useless in some areas.
- Near Grants, New Mexico north of the Gila Wilderness area; Malpais lava flows; compass rendered useless.
If your compass and your map persistently disagree by an unexpected amount in a particular spot, the ground may be the culprit, not your math.
If you are in unfamiliar terrain, do a sanity-check bearing between two known features before you rely on your compass for real navigation.
Application by audience
Different communities default to different norths, which is why "say which north" matters so much in cross-community work.
- Aviation and marine charts often have pre-printed Magnetic North lines. Most other maps do not.
- Military, SAR, and UTM/MGRS-gridded maps make Grid North prominent — the dense UTM grid lines are the working north reference.
- Civilian backcountry on a USGS topo prints Grid North on the UTM grid and True North on the lat/lon lines and edges. Magnetic North isn't printed, though some users draw their own Magnetic North reference lines. Users typically pick grid or magnetic, depending on their compass setup.
Group conventions
Many organizations adopt an internal standard north reference — everyone agrees, for instance, to use grid bearings. The convention saves on conversions when everyone shares the reference, but two caveats apply:
- The convention doesn't excuse you from labeling every bearing. A bearing without its explicit north-reference label is useless to anyone outside the agreement — the SAR team called in to help, the next group you hand off to, yourself a year later when you've forgotten what the convention was.
- A standing convention can dull your familiarity with the alternatives. When you never have to think about which north you're using, you're less likely to notice when a new compass or GPS arrives configured for a different reference.
Always say which north
The single most useful discipline you can develop: no bearing or heading is complete without the word True, Magnetic, or Grid following it. Don't make people guess — say it and write it.
"Bearing 45°" is meaningless. "45° magnetic" or "45° grid" is unambiguous and self-documenting weeks later. This habit catches more downstream errors than any amount of formula drilling.
Further reading on maptools.com
- North References tutorial — the three norths and how to use them
- Magnetic Declination Calculator — look up the current declination at any U.S. location and print a reference sheet for the field
- North References video, part 1 · part 2 · part 3 — short walkthroughs
- North References on YouTube — companion video
- North Reference Sheet (PDF, instructors) — printable handout