Plotting a bearing on a map using a round lensatic compass
Sighting the bearing
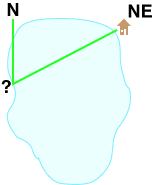
To determine our location we are going to combine two pieces of information on our map. We know that we are somewhere along the shoreline of the lake. Using a compass we can sight a bearing to our cabin across the lake. When we plot the bearing on our map, our location will be where the line between our location and the cabin crosses the shoreline of the lake.
Determine a rough direction to the target
Use a compass to get a general sense of direction for North, South, East, and West. Identify on of the eight compass points (N, NE, E, SE, S, SW, W, NW) that roughly describes the direction to our sighting target. In our example at the lake, our cabin is NE of our current location. Refer back to this "reality check" occasionally during plotting to make sure what you are doing makes sense.
Sight the bearing to the target
Most lensatic compass have a compass card marked in 5° and 10 mil increments. 5° is not precise enough for anything but the crudest work, so it makes sense to make our sightings and do our plotting using mils.
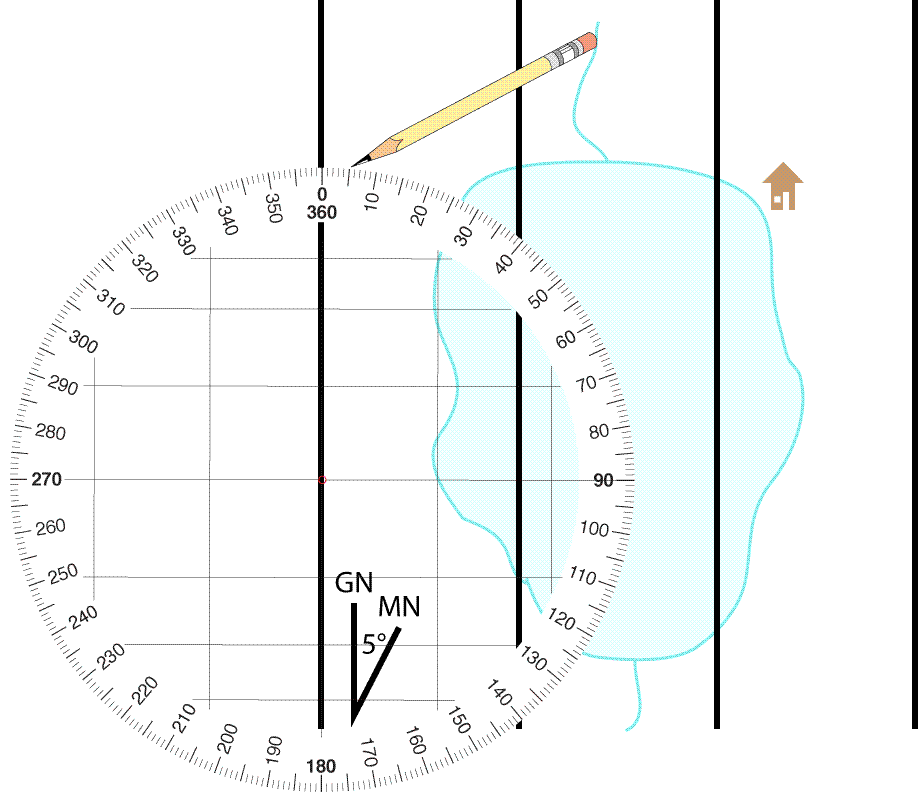
Using our compass we have sighted a bearing to our cabin of 1070 mils from Magnetic North. The north reference is an integral part of any bearing. Make sure you include it when you say or write a bearing. We can abbreviate to either 1070 mils Mag. or just 1070 mils M
We will be plotting our bearing relative to Magnetic North, so there is no need to adjust for a different north reference.
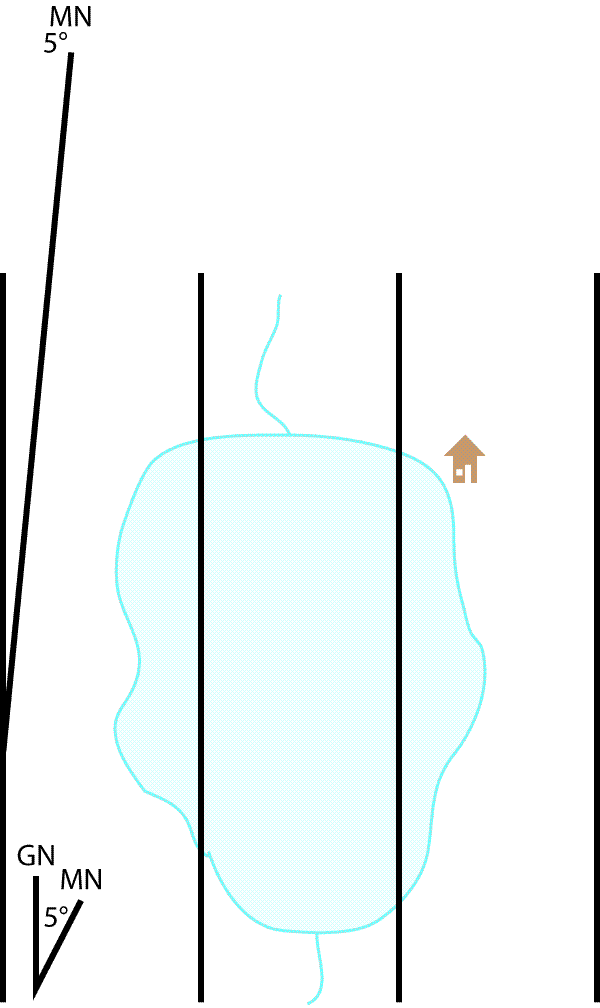
Our bearing was taken from an unknown location, towards a known location. When we plot it on the map, we will start plotting at the known location, and extend the bearing line back towards the unknown location. This is known as a back bearing.
For more information on forward and back bearings, see our tutorial on forward and back bearings.
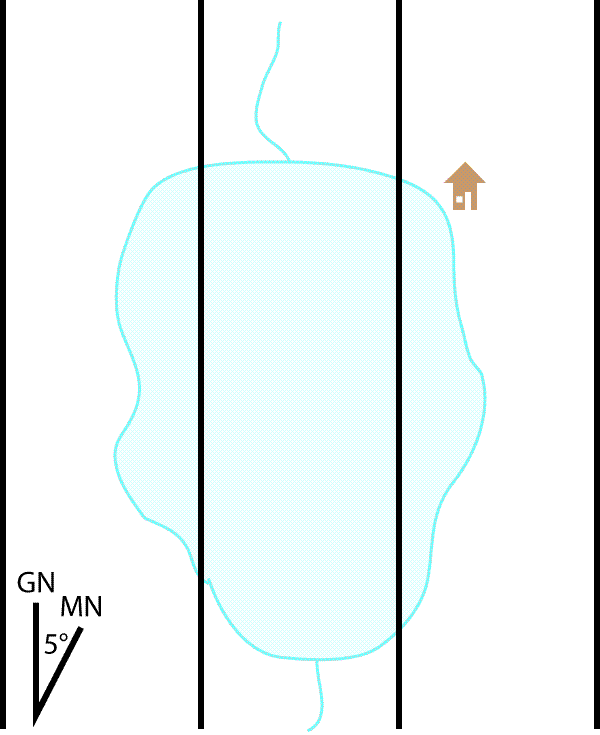
Establish an accurate Magnetic North reference line
We will be orienting our map with Magnetic North. To do this we need to establish an accurate Magnetic North reference line on the map. You may be tempted to use the MN line on the declination diagram, but be careful. The declination diagram may not be drawn with an accurate angle, or the angle may not represent the current declination. The smaller the angle to Magnetic North, the more likely the diagram will show a larger angle. The older the map, the more likely the declination shown in the diagram is no longer correct. Generally once you have drawn your own Magnetic North line, you will not need to do this again on this map sheet for many years.
Using a protractor aligned with either True or Grid North (depending on what the magnetic declination you are given is referenced to), make a mark on the map at the desired value. Then use a straight edge to draw and label the Magnetic North Reference line.
Step by step procedure for plotting with a straight edged lensatic compass
Orient the map with Magnetic North
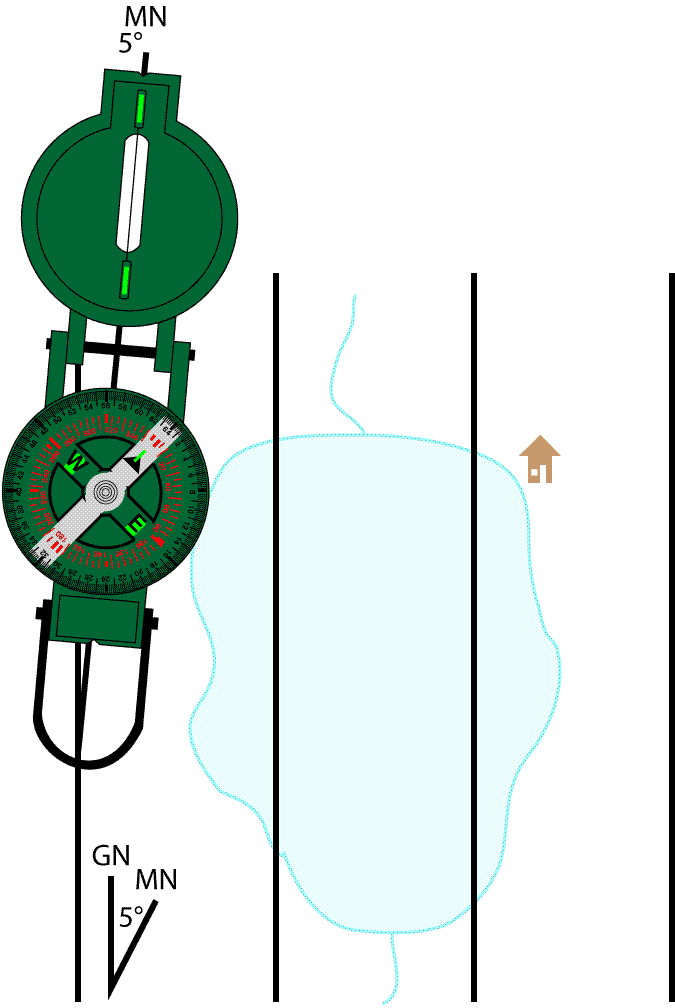
A round lensatic compass has no straight edge to align. Instead you will use an imaginary line that runs down the center of the compass. Two parts of this line include the sighting wire, which you can align with things that are visible on the map, and the center of the rotating compass card. Some of these compasses have a notch at each end of the housing along this line. If your compass does not have these notches, you should add them. Use a straight edge aligned with the sighting wire and central pivot point. Mark the position of the notches to be with a pencil. Use a file to make a permanent notch at each end. Or make a permanent scratch mark, paint line, or permanent marker line on each end.You will use these notches to align your compass with a line on the map or to mark the location of a bearing line your are about to draw.
Align your compass along your Magnetic North reference line.
Now rotate the map and the compass as a unit, until the compass dial is aligned with north.
Note that we are using the magnetic dial in the compass. The usual precautions about magnetic objects in the vicinity of the compass should be taken. Pay particular attention to the surface your are working on. Many wooden tables also have bolts, nails, screws, and other metal components. Don't even consider using the hood or tailgate of a vehicle.
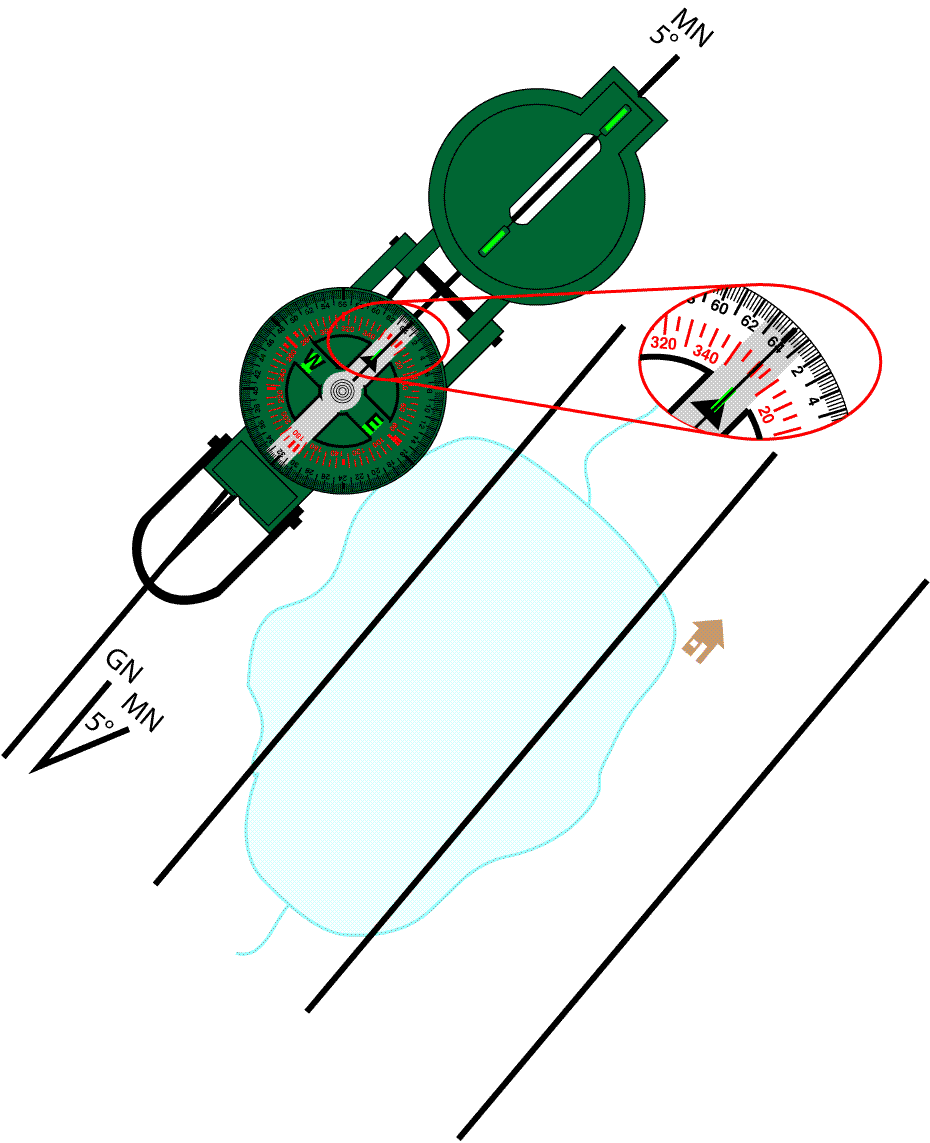
Orient you compass with the bearing, and draw the bearing line
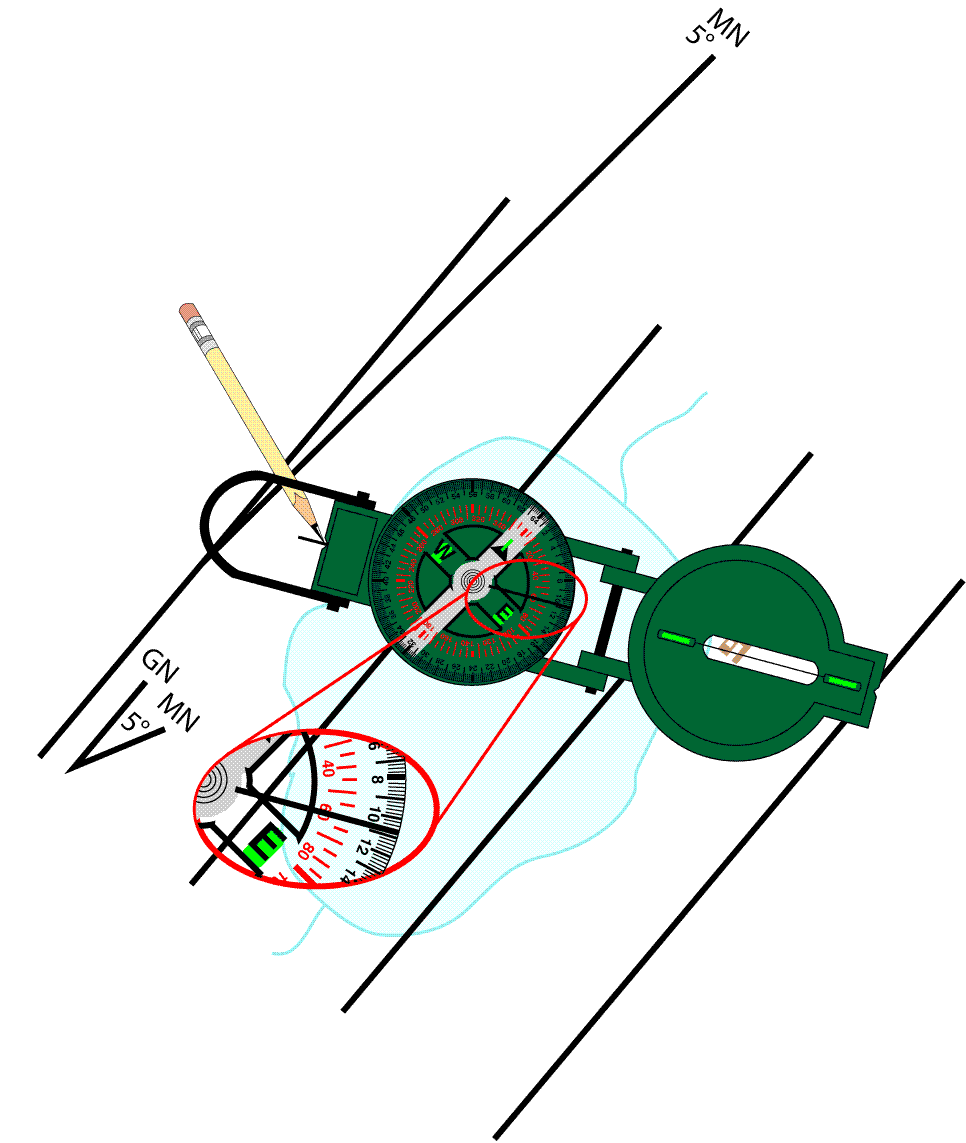
Next, without changing the orientation of you map, move your compass so that the point you are plotting to/from is under the sighting wire, and the compass dial reading matches your bearing. Make a mark with your pencil at the notch on the end furthest from the sighting wire. Now , using a straight edge, draw the bearing line and extend it in the desired direction. In our example will will extend the line as a back bearing.
We have established our location on the map
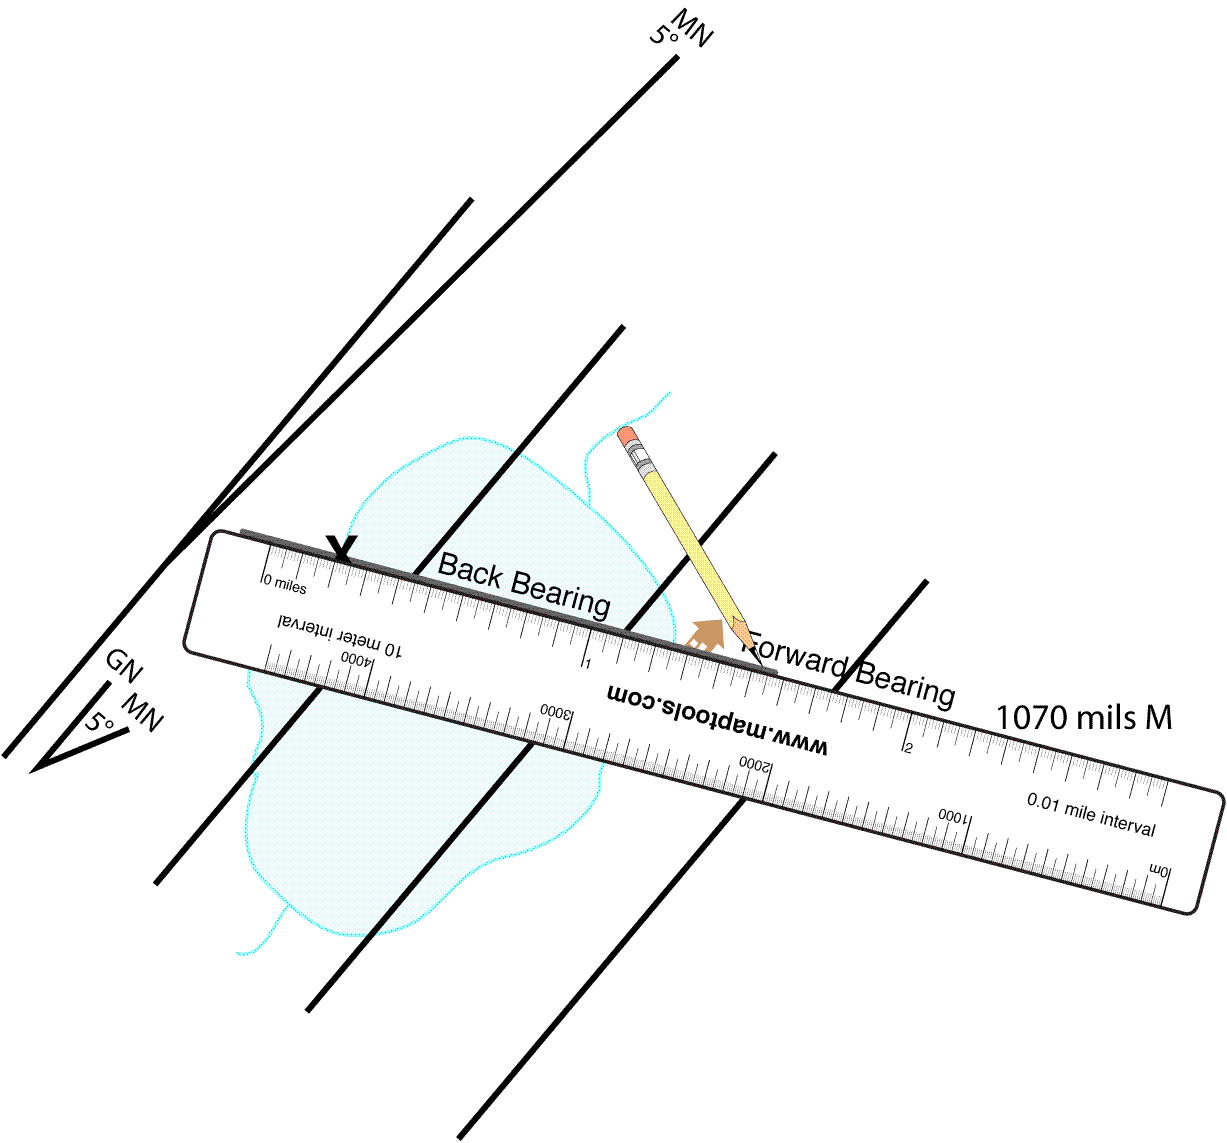
The location we sighted the bearing to the cabin is where the back bearing intersects the lake shore. In order to detect any errors we may have made, it is recommended that you plot at least one additional bearing to a different known location.
The need to carefully orient the map, and the precautions about metal in the vicinity of the compass makes this type of plotting more difficult than most other methods. Perhaps this is why most military personnel are trained to plot bearings using a protractor on a Coordinate Scale and Protractor tool.
Additional techniques for plotting a bearing...
- Plotting a bearing using a protractor
- Plotting a bearing using a baseplate compass
- Plotting a bearing using a baseplate compass adjusted for declination
- Plotting a bearing using a straight edged lensatic compass
Continue this tutorial on plotting a bearing with these links:
Plotting a second and third bearing to confirm your positionUsing bearings to locate a distant target